 Section View
Shows you a section view that is perpendicular to the two points you locate.
- Step-By-Step
- Tips and Tricks
- Related Tools
1 . Click the Section View icon, which is pictured above. The icon can be found on the Layout page > Navigate section.
Alternative: Invoke Section View using the Find Tool by searching the command name and clicking the icon, which is pictured above.
Learn more about alternative methods for launching commands.
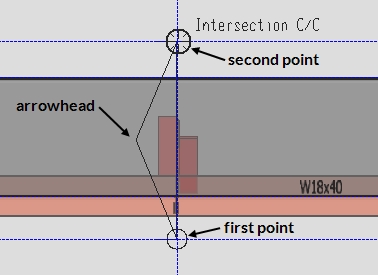
2 . The status line prompts "Add: Section View". Various Locators become active along with Locate - Pan - Return mouse bindings. Left-click (Locate) the first point of the section view to define one lateral boundary of the section view.
Alternative: Press Esc or right-click (Return) to cancel the command.
3 . The status line prompts "Locate second point". The arrowhead that appears when you move your mouse cursor indicates which direction the section view will face. Left-click (Locate) the second point to define the second lateral boundary of the section view.
Alternative: Press Esc or right-click (Return) to cancel the command.
4 . Your current view in the model changes to the new section view. The view is perpendicular to the points defined in steps 2 and 3. The section view displays any steel that falls within the lateral boundaries defined by the first and second points (and falls within the Depth checking limits).
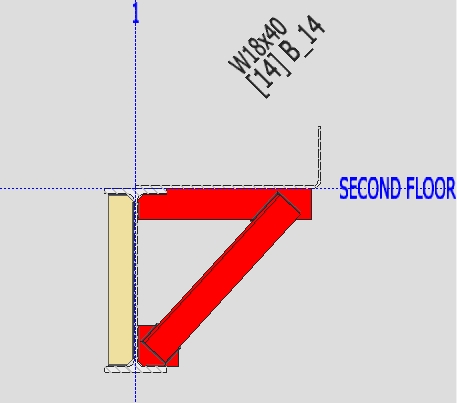
Note: At this point you have not actually created a new view; you have simply changed your current view in Modeling. Use Save View As to save a complete section view or Save Area to save a partial section view.
- The resulting view looks at the model in the direction of the arrowhead that appears as you move the mouse pointer (
 ) to locate the second point. The two points also set the horizontal boundaries of the section view.
- Section View changes your current view in the 3D model. To make a permanent copy of the section view, use Save View As to save a complete view or Save Area to save a partial view. You can then use Open View to easily re-open the view in Modeling or use Detail Erection Views to create an erection view drawing of the section view you saved.
- Select a member or material prior to cutting the section view, and the view change will automatically zoom-to-fit on the object you selected.
- Current view location (changed by Section View)
- Save View As (to save a complete section view)
- Save Area (to save a partial plan view)
- Undo View Change (to undo Section View)
- Revert (undoes a series of view change operations)
- Detail Erection Views (draws the section view if it has been saved)
- Add Grid Line (alternative to Section View)
- Depth checking (controls visibility in and out of the reference elevation)
- Section View (a related tool in the Drawing Editor)

